Monday 26 May 2014

Final Statement

Overall 
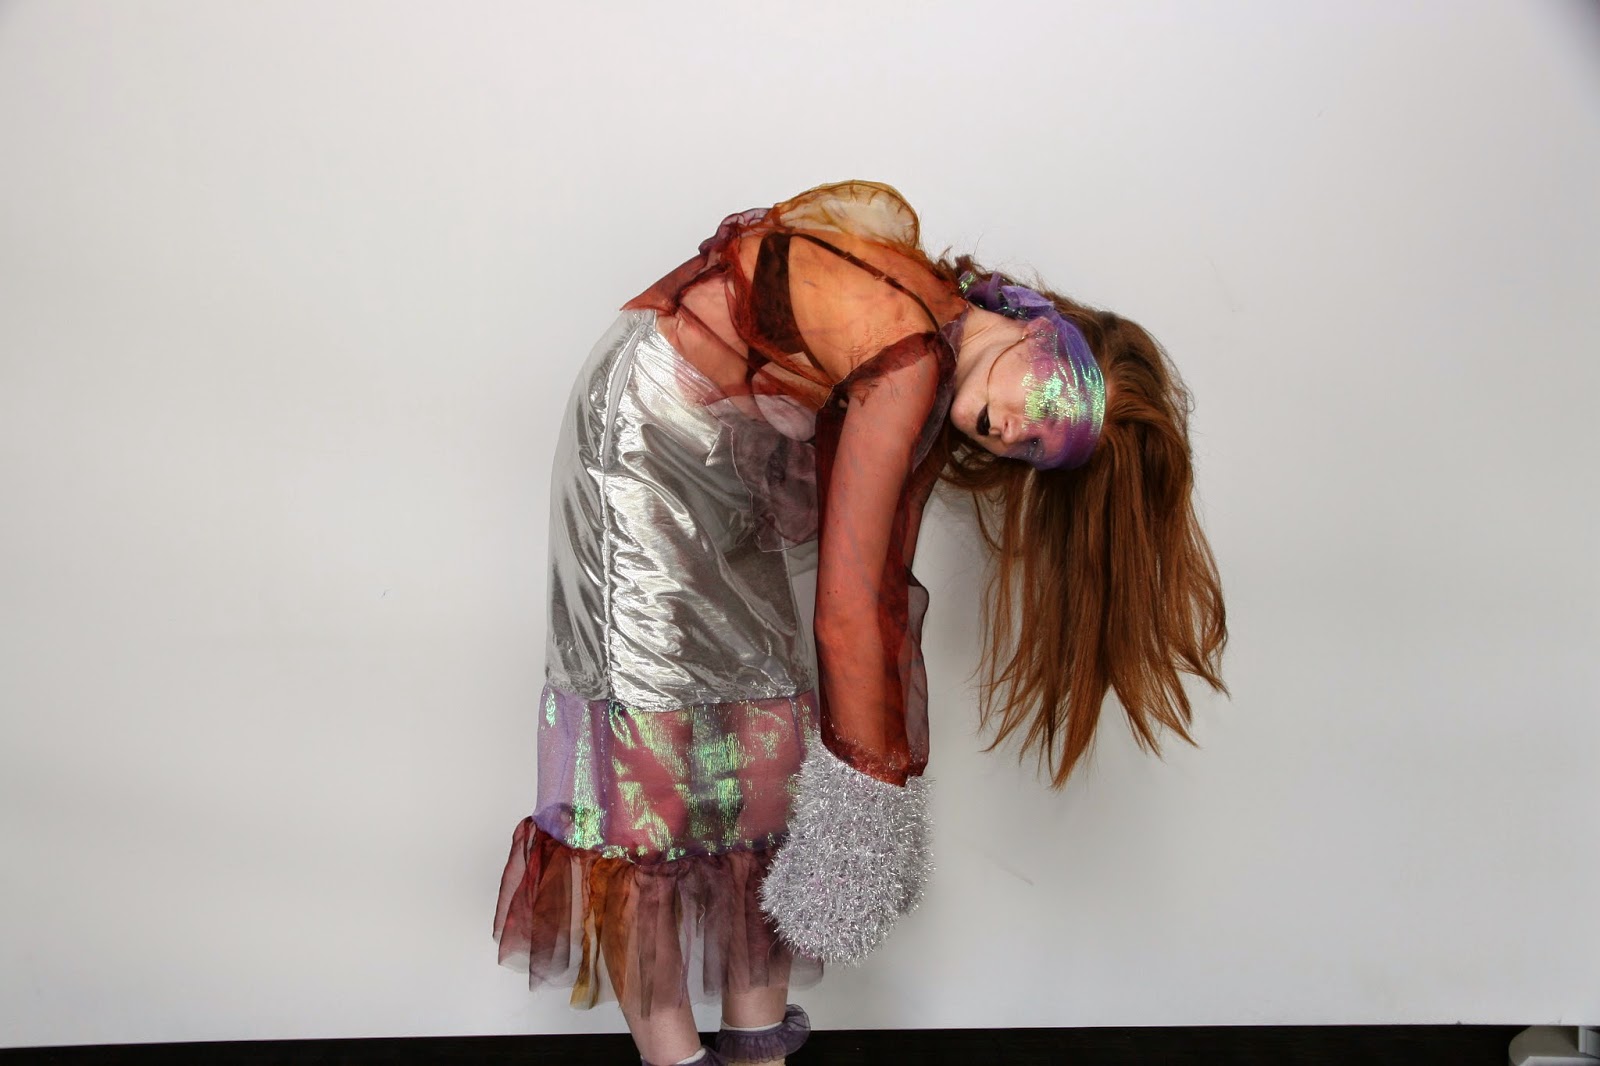
the final outcome I have produced for the FMP is one Line up board consisting of six designs, a final look consisting of two garments a skirt and a jacket and then a final photo shoot that highlights and emphasises my projects key themes. The starting point to the project was based around narratology, which is the study of narratives and their structures. I chose this theme as it had many different theories related to it, and I was already familiar with these theories and had a genuine interest in this topic. However comparing this original concept to my final concept I would say that I have developed my ideas quite a lot as my final outcome is inspired by things that aren't obviously related to the topic but are inspired by the subjects that narratology discusses.

For example I began by looking into Kate Domailles theory of narrative, where she discusses that every narrative can fit into 8 different original stories. I looked into two of them the first being Romeo and Juliet, I found a quote that was inspiring to me because it consisted of many metaphors that portrayed emotion in the imagery they created. I also looked into the story of Cinderella, which is about dreams coming true. After discussing these concepts with my peers in a series of interviews I liked the different feelings and interpretations people had. So I focused on the Cinderella idea, developing concepts such as the haziness and brightness they contain. Which then lead me onto showing these ideas through fabrics where I collected a variety of metallic, sheer, shimmery, transparent and translucent fabrics to portray these ideas.

I then moved on to looking at my other theories which were Levi Strauss and Laura Mulvey. I briefly researched into Strauss' theory of binary opposites as I didn't want to focus that heavily on it, but I just liked the idea of having two conflicting themes, which I tried to incorporate throughout my work.  The second theory was Laura Mulvey's theory of the male gaze which lead me onto looking into how the media look at woman which is either in a voyeuristic or fetishistic way. This was probably the most important element to my research and development as this theory was the starting point to the majority of my work as it inspired looking into what is considered 'attractive' and 'unattractive' which then lead to distorting the body. I really liked this concept especially of the distorted body because it created some really interesting shapes and it lead me onto looking at photographer Yamanaka Manabu's work, where he focused on societies outcasts such as the old and the disfigured. Where I began looking at these shapes a developing off of them and therefore developing the concept for distortion of the body.

Yet with this in mind I wanted to work in the dreams concept a bit more so I thought about the distortion of the mind as dreams are distorted and unclear sometimes. Also at this point in the project I was listening to trance like music and one of the songs was called DMT by XXYYXX. I knew from my own knowledge that DMT is a drug that it released in our brain when we are born and when we die. It's also released during lucid dreaming. So I wanted to develop this idea because I thought it was quite an interesting and deep concept that I could develop really far. So after watching one particular video on YouTube where someone was discussing their DMT story they described how everything was distorted and disassembling and how it was an energetic and euphoric moment. So I chose 4 words that I felt would sum up the DMT experience the best, which were, Euphoric, Disassembling, Energetic and Spiritual. I then began to represent this ideas through my own research, imagery and drawings. I found my sketchbook really helpful for this mainly because it allowed me to visualise my ideas a lot more clearly and I could identify what areas I should develop and also what areas aren't quite as strong and I should not develop any further.

This lead me to experimenting with knit samples, because I felt that the knitting related to the idea of disassembling. My choice in wool was very important because the metallic wool frilly wool portrayed the dreams aspect so well because its shiny and its also very textually pleasing. This part of the project was probably the first time I had struggled. As up until this point my research and developments had been fairly free flowing, nothing was forced the ideas just all came naturally. But with knitwear I had to teach myself how to knit which is where a lot of my time went. Although I am really pleased with my knit samples and developments off of these samples I do feel that I could have spent less time on this part of the project. As I was quite far behind my plan at this point but up until working with knit I had been on target and things were going well.

I carried on developing my work in terms of textiles such as developing my knit samples and then creating heat press samples and then designing prints inspired by the strongest themes of my project. I had mainly received positive feedback on these samples and developments however my tutor suggested developing shapes that I could use for my final designs. I looked back at my early research and began developing the distorted body shapes with my prints and fabrics. I also spent one day just creating designs on the stand. I feel that this day was the most influential in terms of development from my concepts into and actual final thing.

Before working with the shapes on the stand my tutor advised me to look at the Comme Des Garcon Lumps and Bumps collection. I had a look at this and found it very inspiring because I was able to see how a designer had produced something similar to the shapes I was developing. It really enabled me to visualise how these shapes could be worn on the body and it also allowed me to develop my work in a more fashion focused direction. So working with the shapes, I produced many different design ideas, which I then developed into rough designs. As this acted as the starting point to my designing.

So at this stage in the project I was on target to following my plan as I was not running behind on time and I believe that I had met the first two targets of my work which were to complete the primary and secondary research stages and then to develop these ideas and concepts into designs. Therefore with these targets in mind I was able to develop my ideas clearly and well which then enabled me to further my designing into a final line up board and then one final look which then lead to me producing a photo shoot that portrayed my main concepts and also showcased the ideas of what inspired my final garments.

I am really pleased with what I have produced for my final line up, garments and photo shoot. I think that my line up ties the whole project together as it incorporates the many different elements I looked into and developed. Also I think it shows how I've pushed myself because I have taught myself how to knit and designed quite complicated structures as well as working with difficult fabrics such as the sheer and latex fabrics as well as designing my own print. I have also tried a variety of new techniques within my working such as I have designed in ways I wouldn't usually and I've tried to challenge myself particularly learning how to knit and working with many different ideas but developing them fully and cohesively. Also even though I faced several problems in regards to making my toile and final garment I believe I was able to work past these problems effectively and efficiently as I didn't allow them to make me demotivated I just rethought my plan and tackled these issues in a different way. Lastly for my photo shoot and mounting my board I took the advice from my tutor and peers and listened to what images and edit ways they thought were the most emotional and which ones related to my project best.

I have also pushed myself in ways of meeting deadlines, because throughout the project always keeping my original plan in mind I had mapped out what parts of my work I needed to do and when for, this allowed me to picture the way my developments and final outcomes would happen in terms of how long they would take as well as meeting these deadlines and producing a large variety of work that was of good quality. The most important things I will remember from this project are how to develop my work fully to really exhaust my areas of interest to allow for interesting final concepts. As well as this mainly time management as sometimes I lack motivation and therefore run out of time, or I have not allowed myself enough time and therefore have late nights. Also particularly in this project and example is that in my proposal I stated I would like to make a film to accompany my work, but due to running out of time as well as focusing a lot on my other work I was never able to produce a feel. I do feel disappointed but then if it would’ve meant the rest of my work would have suffered, I would prefer to have no film and good quality work. Although overall I feel in this project even though my time management was poor at times I was able to make up for it in other aspects. Therefore for future projects I will make sure I have allowed myself enough time and aim to finish a week before my deadline as this will then allow me lots of time to perfect my work. 


Concluding that I feel this project has gone well, although at times I faced problems, such as running out of time, demotivation, restrictions stopping me from finishing things or even just being stuck for ideas. I think I have managed these very well, particularly in comparison to past projects where I have let my work suffer. Yet for this FMP I have not let my work suffer and have been determined to push on in order for my final outcome and all of my research and developments to be thorough and of a high quality. The FMP has allowed me to develop as an individual and a designer I have gained many new skills and thought processes that has allowed my work to improve substantially, therefore leaving me with many strengths and skills.

Wednesday 21 May 2014

21/5/14

Today I was only in university for a short time because the only reason I went in was to mount and hang my work on onto my board. Before doing so though I talked to a couple of tutors to ask about there opinion and they also agreed with my original decision of mounting the image my model matte PVC over her face. Therefore I mounted this onto my board, I really like this image, however I had though about making it look more interesting such as hanging a piece of translucent fabric on top of it to distort the image, however I decided against this as this would have proved quite difficult and also I felt that the image was strong enough I didn't have to add anything to it. As well as this although my board is quite simple I think that if I had any more or any less on it it would not be as dramatic and it would lose some its meaning and possibly not highlight my concept well enough.


Therefore overall I am quite pleased with how my final garments and shoot turned out because I feel that they represent my concept very well.

Thursday 15 May 2014

15/5/14

Today is the last teaching day as next week I have to prepare everything for mounting my board before the deadline. I mostly spent the day editing my photographs from yesterday as this is the last thing I have to do as my sketchbook is all finished I just need to add in my final images and then its finished.

I looked through my photographs and chose four of my favourite then taking one of them I edited it in a variety of different ways, such as blurring, adjusting the colours and saturation's, manipulating the image and finally overlaying a different image on top. My favourites are the blurred image the one where I had overlaid and image of glitter on top. These two both represent my garments and project well. but after asking different tutors and peers they helped me to decide how I should edit them. I decided on the one with the glitter. I feel that this one probably refers back to my earlier research a lot better as the shiny elements exaggerate the dreams aspect. Where as the blurred one was really interesting to look at it is difficult to see what the garment actually looks like, and I want my garments to be the main focus point as they reflect my project as a whole.


I then edited the other photos in this way, but whilst editing I noticed that two of my images are actually very similar, so I decided to not use it as it wasn't adding anything to my work. The final three images I am really pleased with I think they all portray my project well and they showcase the garments beautifully and they are also really aesthetically pleasing and interesting to look at. So with this final part to my project I am really happy how it has turned out.

Later on speaking to my tutor I wanted to ask her if she liked them and also who I should present them onto my board. She really liked them and we discussed both of our favourite images and in the end we both decided that the image where my model wheres the matte PVC over her face is the best. I then said that I thought about just having this one image mounted onto my board and she agreed. I then printed out this image in A1 and was really pleased with the results, but I also printed my second favourite image out in A1 just in case there were any sudden changes. As well as this when I was printing I printed my three images out on acetate to see what they would look like and although very interesting to look at, they weren't as strong as my final image.

Wednesday 14 May 2014

14/5/14

Going into university today I was quite excited because today I planned to do my photo shoot. Once into university and speaking to my model I talked her through my idea and my concept so she could understand the attitude and mood I wanted my photos to carry. I also decided it would be best to take the photographs later in the afternoon when there were less people around and as I was unable to book a studio I wanted to take advantage of natural light. However avoiding the over bright sunshine I waited until about 4pm. I think that by doing the photo shoot at this time I would have a really good natural light that would compliment the garments well.
Whilst waiting for the perfect time for the photo shoot I carried on with other work such as finishing off my CAD designs, which was just editing my final line up and adding final touches so it's ready to be printed out. As well as cutting the loose threads from my garments and checking that it needed no last minute adjustments and finishing touches.
By this time it was ready to do my shoot. Therefore I began to prepare for it, first I needed a white screen and luckily I found this by a large window which was perfect because I had a large white background and good natural light, also it was out of the way so there would be less people to distract me or the model. Then I started styling and dressing my model. I chose my model specifically because I thought her aesthetic would compliment my garments really well as she's thin and tall, this allows the garments distortion to be exaggerated as well as her red hair also adds another element of colour that compliments the garments.
I styled her quite simply mainly because I wanted my garments to be the main focus point. I simply dressed her in the skirt and jacket with a pair of purple frilled socks worn underneath a pair of sparkly socks. I wanted these because they really complimented the shiny textures and frill on the skirt. Also the layered socks made for an interesting aesthetic. She also wore a pair of black platformed trainers. I believe that their clumpy look worked nicely with the distorted body idea as my model looks like she has abnormally long arms and legs and a hunchback. Next I did her hair and make up and as I wanted to work in more of the dreams aspect of my project into the shoot I put a white shimmery eye shadow around her eyes and across her brow, then I added glitter to her eye brows, this look was really interesting to look at because it is very unnatural looking. The next thing I did was cover her eyes with a thin piece of matte PVC because this linked back to some of my earlier developments with translucent fabrics and the hazy vs bright dreams element. It was also one of the styling looks I created in preparation for this shoot along with a collection of inspiring images.
Once covering her eyes I looked back again at the variety of different styling ways, I chose to go for bringing her hair over the fabric. This worked really well as it looked very dramatic and refereed back to my dreams and DMT research which I was was eager to portray and highlight within my final garment. Furthermore as her hair is a rich red colour it complimented the colours in the jackets print and actually clashing with the purple parts the garment which would normally clash however I believe that it strengthened the look because it added anther colour and worked very well with the distorted body, making the overall look odd as it clashed but strangely worked as well. 

Therefore when it came to shoot the images my model was really interesting to look at, especially with the different colours and textures. I think it gave my images depth. I had planned for my images to look distorted and unnatural, so I made my model pose in a variety of positions that looked uncomfortable and odd looking, particularly with the hunched back and lengthened arms. After taking a variety of images I showed my model so she could get a better understanding of what aesthetic I wanted. We then worked together on suggesting new poses and positions, at one point working with props such as her sitting on the chair. I liked the images of her sitting awkwardly on the chair but felt that they weren't as strong as the images of her standing up. Also with these shots I had changed her hair to it being in a high ponytail, and looking back at these images I was able to identify that this was not a strong look because with my whole projects concept her face and eyes being covered emphasised this so much better so I put it back however changing the fabric around her eyes to the purple shimmering fabric that had also been used in the skirt. This was another good look and I think it was important that I changed her styling a bit because it made the images a bit more interesting and added more variety especially as there is little miss en scene with the images as they are just taken with a blank background.

Additionally I also tried to take some pictures looking through the knit sample like I did before when I developed a print off of those images. For this I had to change the camera settings to manual focus because the knit was so close to the lens it couldn't focus. I only took a few photos like this because they came out quite bad and not like they had the first time I tried this technique. I moved on because I knew that they wouldn't create the effect I wanted and I already had a variety of strong images and if I really wanted to use this technique I could always digitally edit the images on Photoshop and create a very similar effect. Therefore moving away from this I tried a few more shots of my model standing and bending awkwardly.
Overall I really enjoyed doing my photo shoot and I am really pleased with the results because looking back at the unedited shots I know I have quite a few strong shots that sum up my project really well. Tomorrow I want to select at least 4 of the best and begin to edit them so I can print them out in anticipation for mounting my board next week, in order to avoid getting behind just in case I need to reprint.

Tuesday 13 May 2014

13/5/14

Today I feel a lot better about my final garments. I think this is due to the fact that I was able to place them on a manikin and therefore see how they would look and I believe that visually they look interesting so I am pleased. However I had identified that the finishing on them is poor such as there are many loose threads and I need to hem the edges as every edge is raw and is fraying considerably. 

So by identifying the finishing touches that I needed to do I began by fixing the structure of the back simply just by ensuring that the wire was creating the correct shape. After this I wanted to resew some of my seams, just to neaten them up. However once I tried using the sewing machine I faced many problems such as it didn't have a needle in it I also was missing a bobbin and bobbin case which is incredibly frustrating however after asking around I finally managed to source these things, yet after setting up the machine correctly and checking it, it still didn't work. I found this incredibly frustrating as I had to wait until I got home in order to use a machine that works. 

Therefore I decided to carry on with my knitting, this is a time consuming activity as I have never knitted as much as this before so it is taking quite a while but so far I have found no problems with this and I plan to sew this onto my sleeves once I have a working sewing machine and then my garment will basically be finished. Although I still need to do the finishes such as hems but I think these can wait until my photo shoot as I am planning on doing my photo shoot tomorrow, therefore I won't need my garments to be perfectly finished as the finishing touches won't be that noticeable on my shoot. Especially with what I have planned which consists of blurring the images and distorting them to go with my theme and to exaggerate the translucent effects had been looking into.
Furthermore once I got home I carried on with my knitting and measured it I wanted it to be 50cm in length as I would then cut this in half to create two 25cm cuffs. I did it this way as apposed to knitting two separate cuffs because it saved me time, not a lot of time but instead of stopping and starting a new knit I was able to just carry on with the same knit. 

Before cutting my knit in half I cut the excess fabric off the sleeves, that being 25cm which I would be replaced with the knit. I know that his wasted fabric however I had planned on stitching the knit on top of the fabric but I actually opted against this because I knew I would struggle with sewing it on and it would look messy, therefore this way I am able to attach the knit more neatly and it will also hold better. 

Henceforth after cutting my knit I sewed the edges together creating a seam on the outside and a cuff. It was a lot easier than I expected to sew the knit as I had anticipated for the knit to get caught in the machines teeth, yet it did not. However some loops in the knit did get tangled around the foot, but this was easily solvable.

So after the knitted cuffs were attached I was was finished, all I had to do was cut the loose threads and then hem the edges of the jacket and the skirt. I don't particularly like hemming as I find it difficult and fiddly. However I noticed that my home machine came with a hemming foot. So I used this, by using this foot I was able to hem my garments very quickly without using pins and also it was a lot neater looking than I had imagined. So after hemming my garments, they were ready for the photo shoot tomorrow. 

Monday 12 May 2014

12/5/14

This morning I set off early because I wanted to go out buy my fabric and then get back home as quickly as possible so I wouldn't waist anymore time, because tomorrow I am planning on doing my photo shoot and my garments need to be finished.

First I bought more of the purple and metallic wool for the sleeves of the jacket. Then I went looking for the metallic fabric that I bought very early on in the project. I went to the shop that I bought it in and I couldn't find it, however I did end up buying a fabric that was even better. They were the same fabric all that was different was the slight coloration as the one I bought is more like a silver where as the one I had previously bought for samples is more grey. So quite fortunate that I couldn't find it because the silver one is more shiny and is better suited to my projects concept.

Once I was home I began by making the skirt, for this I needed to take apart my toile because I didn't make a paper pattern. Once it was taken apart, I pinned it to the fabric and cut out the fabric. The only part where I had difficulty was when I added in the darts because I made the markings with tailors chalk but it didn't show up well, so I had to use a pen and make small dots of where I needed to fold the fabric. Then once sewing the darts together I sewed the skirts front and back together at the edges, but only on one of the edges as I would sew the other edge together once I had attached the other pieces. Yet when sewing I made sure I had a 1.5cm seam allowance because the fabric is very prone to fraying. The next step was adding the purple shimmery fabric to the silver, I cut this out and sewed the two pieces together then sewed it to the silver fabric, yet when I sewed the purple fabric on I made sure that the tension of the stitch was at its lowest because the purple fabric has a very loose weave and is very fragile because it comes unwoven very easily, but with the stitching smaller this will help to stabilise it. With this in mind I attached the ruffle. So now all the elements to the skirt were sewn together and now I had to sew from the top of the skirt to the bottom. I sewed all along the edge however I left a 10cm gap in one of the side seams as this is where I added in the zip. Usually I struggle with adding in zips but this time I had no difficulty.

Making the skirt was fairly easy, I had no major problems, I think because after yesterday I understand the fabrics better and also because it is a fairly easy pattern. So with my skirt finished and my jacket nearly finished all I had to do was add the knit onto the bottom of the sleeves. However I know it will take me quite a while to knit the sleeves especially as I need quite a lot and as my knitting skills are quite basic and I'm very slow. So I started knitting and did so for the rest of the evening, I got about halfway through. Yet as it is taking me a lot longer than I had anticipated I will have to push my shoot back till Wednesday because I just need one more day to finish the garment and then prepare for the shoot. Luckily I checked in with my model and she is able to do Wednesday now instead.

This is frustrating but there isn't really anything I can do, fortunately it won't set me back that far, just tomorrow at uni I will need to finish the knitting and then sew it to the sleeves.

Sunday 11 May 2014

11/5/14

The last few days I have been making my final jacket and skirt. I started with cutting out the pattern pieces. Firstly with my jacket I need 8 small semicircles and then 3 larger semicircles. I cut these out onto my sheer printed fabric it was a little bit difficult because of the fabric being sheer it kept moving, but I cut them out fine I just had to be careful. Then similarly to the way I made my prototype I placed the pattern pieces of the pieces of the jacket and then pinned them together that way. I found this difficult because I didn't have a manikin at home and I was unable to go into uni to use one. So I made do, but I pinned it all together successfully it just took me a lot longer and was a little bit fiddly trying to match hop the correct pieces. So I sewed this together and like in the making of my toile I made a tunnel for the boning. Then I attached it to the jacket after I had inserted the darts which were straight forward. The only real problem I had with sewing the the jacket together was when I sewed the fabric would pucker slightly because it's such a thin and sheer fabric. Also I had difficulty choosing what colour thread to use, because the print is multi coloured and practically every pattern piece is a different colour, I tried red, orange, black and then finally a light grey. The red and black where the most noticeable and the orange worked well so I used that for most of the back which contained a majority of the red, yellow and orange colours, then for the rest of it I used the light grey as this was the least noticeable. I attached the sleeves the jacket after I had added in the front sections. 

So with the jacket all sewn together it was time to add in the boning. I added in the boning and cut the pieces the correct size. However it didn't work the same way it worked with my toile. This was because of the fabric being so thin that the wait of the boning just weighed it down and actually making the jack sag. This was very frustrating and stressful because I was stuck and with the jacket m=being the main feature I did know what to do. I tried pinning it in different ways, but none of these ways worked and I was stuck. Yet after speaking to my parents and telling them of my predicament, they suggested using gardening wire. Luckily we had some in a dark green colour, so I tested it out and it worked so well, I was really pleased that I got past this issue because I was begging to give up and rethink my idea. So I inserted the gardening wire and it gave the jacket a much better looking shape and actually was closer to my designs shape than my prototype was. 

By this point it was quite late so before I went to bed I quickly made the ruffle for the bottom of my skirt, this really quick to make and gave me now problems. I wanted to make that because tomorrow I plan on buying the rest of the fabric for the skirt. 

Friday 9 May 2014

9/5/14

So by having the next couple of days off from university I planned to have my garment fully finished by the beginning of Tuesday as I am hoping to conduct my photo shoot at uni on Tuesday. 

Therefore on today I carried on with my toile because I find it greatly helpful by making a toile first because this allows for the making of the final garment to happen more efficiently. As on wednesday I had only finished making the construction part of the jacket today I focused on finishing the jacket which entailed adding in sleeves and also making the skirt. I know that I could finish my toile relatively quickly if I worked efficiently.
To make the sleeve I took an already existing pattern and altered it. The original pattern was a loose fitting sleeve that was a three quarter length sleeve and instead of having an even hem line it had a zig zagged edge. I used this sleeve as a block because it has the basic shape that I needed and I am confident enough to adjust the patten. In terms of alterations I cut the block in half placed in on some pattern paper, however making sure to add a 20cm gap in between the pieces, this is in order to lengthen the sleeve drastically. I also wanted to straighten the hem so in order to do this I just used a ruler and drew a straight line from on end to the other. 
Following this I cut out the new pattern, pinned it to some calico which had been folded so when I cut the pattern I will get two which will save me a lot of time. Once having two sleeves cut out, I pinned along the seam edge then sewed the seems. Leaving me with two finished sleeves. This was really easy and actually quite simple as well as this it didn't take me long at all and I am pleased at how well the sleeve came out. Also I'm happy that I added in the additional 20cm because now the sleeve is very long which exaggerates my distortion of the body concept even more.

Following on from this and Wednesday, when I cut the skirt up so I could see where the two different fabrics would join, I sewed the separate pieces back together and began to make the ruffle for the bottom of my skirt. For this I cut out a 1 metre long piece that was 30cm wide. With this one piece cut out I then cut it out four times in the calico. Sew the edges together so I had one 4metre long piece then along the longer edge I sewed all down it, making sure the tension on my machine was the highest as I was going to use this stitch as the thread to gather and make the ruffle. The first time I did this I began pulling the thread to get the ruffle and the thread snapped in several placing, this begin very frustrating I sewed it again, and the same thing happened again whilst trying to gather it. I changed the thread because i believe the thread I was sewing with was cheap, once the thread had changed I gathered it again and it worked with out any issue. However looking at the gathered ruffle I though it was quite tight and had a bit too much volume, so I took out one of the panels and the gathering looked a lot better because it was a bit more loose and fell more naturally. Then I attached it to the bottom of my skirt. I then tried the skirt on because I was at home and didn't have a manikin. The skirt looked good and so did the jacket, the fits were good and it looked like my final design, so I was ready to make my final garments. Although one thing I noticed was the the skirt was possibly a bit to long, so I pinned the ruffle so it lost 10cm and looking at it again I decided I would shorten the ruffle from 30cm to 20cm. 

Overall today was good, I am pleased with my toile now that it is finished and I am ready to create the final garments. Also I am pleased that I was able to make the toile relatively quickly because now I shouldn't get behind on the making of the final items. 

Wednesday 7 May 2014

7/5/14

I feel that today has been a lot less stressful as I was able to work a lot better than yesterday. I started today by making adjustments to my paper toile on the stand. I left it yesterday with a hunched back and a bloated stomach. By looking at it again today I am pleased I changed the design as the front doesn't match the back, because the back has more structure and depth due to mix of different sized shapes, where as the front is smooth but just sticks out. I decided to remove the front and I began thinking of what I could do to make it more interesting, yet after reflecting on yesterday I knew that I wouldn't be able to make any shapes that would perfectly go. So with the front now flat I also decided to add on another lump to the side I think this highlights how the body will look deformed and distorted even more. 
So with the new design redrawn and the paper back finished I began to make it out of calico. For this all I did was cut out the pattern and I pinned the pieces to the paper pieces whilst it was on the stand so I could replicate the final shape. I did it this way because I knew that especially after yesterday I would not be able to get the same shape again very easily, but this way I was able to make the same shape out of calico very quickly. With this all pinned together I sewed the back together, but I i made sure I had a 1.5cm seam allowance because I had to leave enough room to put the boning in. Therefore once the back was sewn together I went back over the seams and sewed them again along the edge along there to be a tunnel for the boning to sit in. This was fairly straight forward and I didn't find it difficult just time consuming especially with inserting the boning and cutting it to the correct size. 

So with the structure of the back made I pinned it back onto the manikin and then began to start working on the front. Luckily I already had a pattern for the front made from previous projects so all I did was adjust to fit and pin this to the manikin as well. The adjustments I made were easy, simply just making sure the the seams lined up and that there was a big enough armscye for when I add in the sleeves. So once sewing this together, and I checked that the fit was good, I asked my model to try it on so I would know that the fit was correct, she said it fitted her perfectly, which is good as if it didn't I would have to unpick it and reevaluate the size. I then moved onto the skirt size which I also had an already made pattern for. I had the pattern already made because I have a block pattern for a normal a-line dress, which is where I got the pattern for the skirt and the front of the jacket. As I used these already existing toiled as a block that I adjusted, this saved me a lot of time as I didn't have to draw out a pattern then adjust it and then make it into a toile, I could simply take patterns that I had already made and just use them as a basis. 

Therefore for the skirt I cut 20cm off the bottom as this would act as the pattern for the purple shimmery fabric where as the rest of the skirt will act as the silver fabric.

Over the next few days I plan on finishing my toile so I begin with making my final garments ready for my photo shoot. 

Tuesday 6 May 2014

6/5/14

Today I wanted to begin making particularly as I had my final design finished ad I am ready to begin making. However today has been very tiring and stressful. This is because I started to make my pattern pieces for my jacket. As my final outcome comprises of two garments first the jacket and second the skirt. I started with the jacket as I knew how complex this would be. It proved to be very complicated. I am making it the same way I created the items I made on the stand. This consisting of one shape that had been cut out in two sizes several times. I was working from the images I took of my stand work. However whatever way I pinned the pieces together it did not make the right shape. I spent most of the day trying to do this and each time failing to make the correct shape. I decided to leave it and return to it later in the day.  
I moved onto printing onto fabric. I bought my fabric making sure it was polyester, luckily I found the perfect fabric which is a white crystal organza, it has a really nice shimmer to it so it relates to my dream concept and it's also transparent which also relates well to my project. I chose it in white because I know that when I print onto it the colours will come out their best. However as the fabric is sheer the print will be too. I printed two samples onto the fabric first just to test it and also to decide which print to use. Once they were printed onto the fabric I feel that they came out really well and are just the aesthetic I was looking for. I printed samples of both, just in case the print I had originally chosen to go with didn't look good, nevertheless they both printed onto the fabric really well, and after getting a second opinion I decided I would stay with the original print I had chosen. 

Therefore I decided I would print this out larger onto my fabric. However I was unsure on how many metres I needed to print onto. I decided I would only print one metre first just to see how it comes out and then it could give me a better understanding of how much I needed. So when it came to printing my fabric onto the print paper the tutor said that to enlarge the image would seriously pixelate it. She showed me on the computer what it would look like, and it did become very pixelated but I decided I print it anyway because the pixelations may not be that clear on the sheer fabric. So once it was printed on to the paper I transferred it through the heat roller. The print came out really well and didn't show any of the pixelations either. 


After this I then went back to working on the stand and trying to work out the shape of the hunched back. After trying a variety of different ways I then finally worked out the shape I wanted. I then began to work on the front which was also a distorted shape. This was much more simpler to do as I just cut out three long rectangles that were slightly curved toward the end. I pinned this all to the manikin so I could see what it would look like and I really disliked the front as the shape was too large and actually distracted from the shape I wanted. So to get past this I redrew my final design actually making the front flat and this looked a lot better and made the emphasis on my concept a lot stronger. 

Today I faced quite a few different issues all mainly small and some very frustrating but I was able to work past them quite well I think, as I didn't let this demotivate me I just did something else in order to clear my head for when I returned to solve the issue. 

Monday 5 May 2014

5/5/14

This weekend has been incredibly busy as I have been working continuously to get all of my design developments done and also to finish a final design because tomorrow in my plan is the beginning of making week which includes creating a toile and finishing the final garment. So things will be incredibly stressful as I have a lot to do which will take a lot of time and effort. 

However over the weekend I feel that I worked the best that I ever have. Well for most of the weekend. Friday and Saturday were very slow days as I was extremely tired from the week before and I felt very demotivated. However on Sunday I began to work more efficiently identifying what I needed to do and planning out all of the things I needed to do in order to get to my final design. 

On Sunday night I planned out everything I needed to do on Monday as there were several things I had to complete. Whilst writing out the plan I also decided how long I wanted to spend on each task. Most we're about one hour however the final task which was digitally editing my designs I had planned for that to take three hours.
I did this because I had to get everything done before Tuesday and I couldn't be wasting time. I also wanted to have the timer so I would work faster because in the past my tutor has mentioned that I work slowly. 

So Monday was when most of the work took place. I had about 8 hours of work to get through and I knew that I would most likely over run because in my plan I hadn't factored in issues I may face or even breaks. 

The first thing I wanted to do was to develop the disassembling idea and begin to design with my knit samples. I wanted to do this so I could combine to distorted body designs with my knits and disassembling ideas. 
To start off this designing I wanted to have two pages that acted as inspiration for the disassembling. These pages would mainly feature work from earlier on in my sketchbook as well as contextual references and samples. However I started having technical difficulties as my laptop could not connect to the scanner and then when I had resolved this issue by using a different computer and transferring my work via memory stick. However when I wanted to print from my laptop the printer wouldn't work. So as a starting point I got off to a bad start. I then decided I would return back to these pages as I could design without them being finished because all of the reference points I needed were on my laptop therefore I used this to help.
The next thing I did was I started designing over 50 Quick designs inspired by my disassembling developments. These took me about an hour to do which was good because I had planned to only take an hour on them. After that I wanted to develop these further by designing again another 50 designs that were a bit more refined and showed my ideas more clearly and pushed them further. At he beginning of this I was working quite slowly however with the timer going I was able to monitor how slowly I worked which allowed me to push myself and work more quickly and efficiently. I did spend more time than I had anticipated on this task about 20 minutes more which isn't so bad as I obviously anticipated a time that was unrealistic. Yet by doing this I did work very quickly. Especially as I wasn't even halfway through the day and I had already done a lot of work that I would usually spend a whole day doing. 

I then refined these into 8 more refined ideas that were neater and clearer I also introduced what fabrics and colours I would use, as this allows me to visualise what these garments would look like if I were to choose to make one of them. Then to develop these I wanted to combine the disassembling and hunchback idea together. Therefore I designed another 16 ideas that showed roughly how both concepts could be incorporated. As I mainly took the shape for the hunchback element but then the way I used the fabrics came from the disassembling concept. 

Following this I refined these combined designs into more developed ideas. Some ideas I really liked and could imagine making however others I disliked and I felt that they didn't represent my project theme clearly enough. Therefore with these 8 finished I developed them further and designed my final line up. I had planned to do 8 designs for this both front and side views however I realised this was very optimistic and I was actually going to run out of time and also I felt that 8 looks could have been too much. Therefore I decided on designing only 6. This way I would save a lot of time and I feel that my lineup would be better because I would 6 strong and interesting ideas compared to 8 alright ideas that weren't very exciting. 

With these six designs all drawn out I scanned them in and started to edit them on photoshop where I added in my prints and fabrics. This took me a very long time to do, mainly because there were may different things I needed to cut out and then add the different layers and adjust the settings of the layers in order for the colours to look right. So after spending many hours on this I finally finished all of them and then decided on a final design. I chose my final design because I think it incorporates all of the main concepts of my project, and would therefore sum up my ideas all together. It features inspiration from the lumpy hunchback shapes I had been focusing on. It also includes some of my knitwear which I am very eager to include. As week as this I lengthened the sleeves in order to eager ate the body shape and distort it even more. Furthermore the transparent and shimmery fabrics emphasise my dreams concept well and also work well with my chosen print with gives a really interesting aesthetic that emphasises the dreams aspect too. Furthermore the skirts fabrics where the transparent purple fabric is joined to the opaque silver fabric was inspired by the disassembling idea. 

Today went really well, I worked hard to get everything finished, I was able to work efficiently because I made a plan and followed it very closely. I'm very pleased that I got everything I needed to, as now for next week I am ready to start making my toile and final garment and now also buy fabric to print onto. 

Wednesday 30 April 2014

30/4/14

Today I was in uni early, before anyone else was in so I made the most of this free time that I had and got on with some work. Getting in early allows me to get working quicker which I believe sets the day off to a good start. 

I began by focusing on the hunchback shape, looking back at the stand work I did in previous weeks. I chose four of my favourite stand works that showed how the similar lumpy hunchback shape could be worn on the body in different ways whilst creating a different aesthetic each time. I'm really enjoying this because I love the structural shapes that I'm able to create, I think they highlight and exaggerate the distorted body shapes. My aim with these shapes is too develop them presenting how they could be worn on the body and how they could distort it.

Therefore for each of the stand works I printed out several images all showing the same design but from different angels. With the different angels I then did one very quick design that I felt summed up what the stand design was trying to create, then developing from this I did 20 very quick designs inspired by the shapes. When I started this I began using a pen but I found that this was taking too much time as I was over thinking the designs. Therefore I began to just draw them in pencil as this allowed me to work quicker as they were more rough. I did about 20 different designs for each stand work. I feel that this worked well for me because I got the hang of it and was able to produce a variety of very quick designs that related to my theme. I think it's important that I provide a variety of very rough and quick designs as this allows me to produce as many ideas as I can which I can then develop into something more thoughtful and refined.  

I think I'm am on target with my work possibly a few days behind as following my plan and timetable I was planning to develop and design for all of this week and then make my garment or garments next week then the following week which is the last week of the project I will conduct my photo shoot. I wanted to also create a short film however I feel that I will not have enough time for this and also I am not too sure what my concept would be for it. However if I find that I have enough time and a concept that is fairly straight forward I will definitely produce one. 
Also today I had a group tutorial, I think it went well as my group gave me some ideas that I could focus on. For example when I mentioned I was thinking about using print in my final work I asked them if they liked my prints and if I should use them. Luckily they did like them which had given me some confidence in these ideas. As I wouldn't want to print metres of fabric and then find out that it was an unpopular print, this would've not just wasted money but also a lot of time. Also they suggested turning my knit samples into a print because they had seen how I had digitally placed them onto some designs. I never thought about doing this so it was interesting to understand how others look at my work. 

With this is mind I started playing around with my scanned in knit samples. On Photoshop I adjusted the colours, brightness, saturation even changed the colours. I liked how these prints looked and thought that they would look really interesting, however I felt that they didn't relate to my work very well even though they were taken from my knits, I think that if I were to use them in my final item it wouldn't relate to the main aspects of my work such as the dreams or hunchback elements. Although these prints did lead me onto creating a prints out of my heat press samples. I created a couple from the heat press samples. similar to the knit print I changed the colours and brightness of the images. I also overlaid my first print. I really liked this effect because it combined the two images creating something visually pleasing. Especially the way it looked like it was sparkling and it had many different colours all merging into each other. This reminded me of the videos I took when I played the Cinderella and DMT videos through the translucent fabrics as it blurred and merged the colours together. This is definitely my favourite print because it relates really well to project and is visually really interesting to look at. 

Overall I think today went really well as it feels like a big step in terms of developing my ideas into a final outcome. Also I feel like all of the different elements of my project are all coming together, and I also look forward to incorporating my prints into my designs. 


Tuesday 29 April 2014

29/4/24

Today I struggled getting into uni due to the train strikes, however the night before I had prepared to leave early so I could still get into uni. Luckily I was able to get in alright it took me about an extra hour. I was determined to get in as now in our third week this is when I need to be at the beginning of making. I also knew that today there was going to be an introduction to print and as I had made developments from my prints over the weekend I would really like to include them in my final outcome. The introduction to print included the print tutor explaining how the printing worked and the formats our prints needed to be which is a tiff format, as this format works best when trying to print with the specialist ink and paper. I also learnt about the two different heat presses one for smaller items and then the large roll press that will easily do metres and metres of fabric. I think when I come to print my fabric I will use the roll heat press as I've used both ways of heat transfer before an I find the roll press to be much easier to use.  Furthermore the tutor mentioned that the fabric I can print on to should be a synthetic fabric preferably polyester. This shouldn't be a problem for me as I know that a majority of fabrics are polyester so I will have a variety of choice. However when I buy the fabric I will have to check that it is a fabric that will print well.  After that, which took up majority of the morning I began to look back through my work as I feel that I am at a point in my work that I can start to design successfully too.


 I began focusing on the hunchback shape and noticed that in my print similar shapes were present such as semi circles and tear drop shapes. Combining these shapes with the print I created and reefing back to the hunchback shape I started collaging with these shapes looking at how they could work and how the colours could be used. I painted these shapes onto figures and used acetate that had my print on it. I used the acetate because it gave a new effect to the shapes as its transparent, it also reminded me of the opaque fabrics I had been developing my work with.

This lead me onto developing these lumpy shapes by scrunching and knotting fabric and then placing it on drawn figures, this allowed me to visualise the shapes as well as looking at how the fabric can be manipulated. I carried on developing these shapes whilst referring back to my developments of the shapes and the voyeurism vs fetishism research, because it was emphasising the shapes of the body.


I think today's work has allowed me to visualise the shapes and fabrics I could use towards my final garment. Today was important because I feel that it has been to stepping stone from my research and developments to the design stage of my work because I am beginning to develop my ideas and thinking of them in terms of fashion now. Tomorrow I am planning on developing these ideas even further and hopefully start to design even if it is very rough. 


Thursday 24 April 2014

24/4/14

Today I made sure that I got into university early. I found this helpful as I was able to settle in and get on with work more quickly and I was more productive. The first thing I did was do some very quick initial ideas off of the knit samples. Unlike yesterday I made sure my drawing was quick and also in pen so I didn't waste time worrying about the technicalities so much. Once I had drawn out ten I scanned them in and began to edit them on photoshop as I wanted to digitally add on the knit samples which I had scanned in. I also scanned in some of my fabrics as I added these two to the designs. For the two new knit samples I did 4 quick ideas each. I liked these as they were a bit more relaxed from my other designs. I think I will carry on designing like this for future initial design ideas. 

Editing the 8 designs on photoshop happened very quickly and effectively I think I am able to work a lot quicker on the computer particularly on photoshop as I enjoy designing digitally because I can show my ideas quickly and I think I am probably more comfortable with digital developments. Yet in this project I have made sure to stay away from digital developments because I've wanted to push myself. As i've found in the past by featuring a lot of digital work in my sketchbook it can appear quite one dimensional and not very interactive. Thats why I've been trying to stay away from using photoshop so much as I want my work to speak to whomever is looking at it and intrigue them and I believe for this to happen I should be less dependant on digital processes. 
Anyway after finishing the digital designs I printed them out on A4 because I want them to act as a fold out. However I printed them on normal paper and after doing this I realised that I should print them on tracing paper because then they would look a lot better as fold outs. Although I had to wait until I got home to do this as that's where I left my tracing paper. Once I was home and they were printed on tracing paper and plead in my book they looked a lot better. 

Carrying on with the knit idea I used last weeks photographs that I had taken through the knit sample. I chose three of the best images that I felt showcased the blurring of the colours in an interesting way. I slightly modified them on photoshop enhancing the colours to make them bolder, this really emphasised the blurred colours and made something really aesthetically pleasing. I began thinking that these would make a really interesting print. Therefore bearing this in mind I wanted to begin to develop this print idea. 


Firstly I after printing the 3 images out I wanted to experiment with the prints. I printed them out again on acetate and this created a different mood and feel to them. I like the acetate prints I think they provide a new aesthetic and enhance the haziness of them which again reinforces the dreams element of my work. I am really enjoying how even though I appear to have many different elements of my work, I feel that they all link and relate together nicely. 

Overall I am happy with today and am excited for the direction my project is going in, I look forward to developing the print idea more. Although I am very conscious of the fact that time is running out, therefore I don't want to spend a huge amount of time on the print especially after looking back I think I spent too much time on my knit samples even though I am really pleased with them I am aiming for the rest of my work to not take as much time as now I have realised how much time I wasted on my knit samples, especially when I did not need to spend that much time on them. 

Wednesday 23 April 2014

23/4/14

Recently I've been feeling a little bit demotivated and not very unproductive, although yesterday was quite a good day. I find my works progress to be slow and I am spending a lot of time beginning ideas and finding out that they're not possible or just not very good. I'm also worried about the amount of time I have left as I feel like I'm running out of it, especially as I'm still developing and haven't started designing, when my aim was to be designing all this week allowing me to begin making next week. I find the whole situation very frustrating especially as I'm getting behind and I cannot afford to do that. So in order to work efficiently and effectively I think I need to stop over thinking ideas and just do them and not be scared of whether or not they come out bad. I learnt this from today as I noticed that I tend to overthink ideas and then not actually complete them which is slowing me down and I'm producing unsatisfactory work. 

I wanted to develop off of yesterdays collage designs so I could produce something a bit more refined. This is where I struggled and wasted time. As when I was drawing I rubbed out my ideas many times. I didn't struggle with designing as I enjoy this, it was more I was finding it difficult to draw which I don't often struggle with but I wanted my designs to be on models that would show a bit more movement as apposed to my usual very straight and regimented way or drawing. I think where I was going wrong was I didn't really know what I wanted to draw and I was hesitant, thats why when I would try and draw something the proportions would be off and I wouldn't be able to design off of them well. Although after spending more time on this than I wanted to I worked through this problem and identified what I wanted to draw. I'm pleased with these designs because they feel and look good and they show my ideas off well which is important. Although from this it has defiantly confirmed that I am too much of a perfectionist, which then leads me to wasting time on trying to get my work to a high standard. However I feel that I would rather do this than have elements of my work to be very week and then other elements to be strong. 

So that was the work I did today, not a lot, that's why I didn't stay late at uni so I could go home and get some work done. Which was just adding refinements or adjustments to previous work and also to sort out my blog a bit. Nothing too major in my project as felt that possibly stepping away from the development stage for a night would help me and allow me to clear my work. As well as this my reading through previous blog posts I was able to reflect on my work and understand what I might do next in my developments. I also decided instead of staying up late I would go to bed at a reasonable hour and intend to get into uni early tomorrow as I think this way I can make the most of the day. As I am planning for tomorrow to be very different from today and I hope that I'll be able to get a lot of work done and further my progress.